Fawn

Pages

Monday, February 29, 2016

Easter Tea Party

Disclosure: As a member of the Oriental Trading Fun Squad, I received compensation and/or products in exchange for my styling and crafting services. This post contains affiliate links

 I am so excited to have partnered with Oriental Trading Company to host an Easter party! Spring is in the air and with the season of flowers almost upon us, I wanted to throw an Easter tea party for my daughter and her little friends to welcome this beautiful time of year. 

Easter Tea Party Ideas


The invitations to the soiree were probably my favorite thing to make. Each guest received a box tied with bakers twine and topped with an adorable pinwheel pick.


   When the guest opened the box, an Easter egg was nestled on top of colorful grass.

 Next, the guest cracked open the egg to find the invitation to the party along with little chocolate bunny erasers  to set the theme of the party.


 I fell in love with this adorable mint suitcase centerpiece and knew it would be perfect for the party. I used it to display this darling carrot trio from The Wood Connection. It also doubled as a favor holder for a nest of sweet bunnies.
Easter Party for Kids

The inside of the suitcase is a soft pink and it was an ideal complement to the party table. The kids were so excited to be able to adopt their own little chocolate plush bunny. The soft bunnies are the perfect size for little hands and they come with a pretty spring colored ribbon attached to the necks.
Easter Party Ideas for Kids

 Here is a closeup of the charming little chocolate bunnies. I placed them in a cellophane bags and tied a pink gingham ribbon around them.  The bunnies were a huge hit and the kids loved having a little bunny to snuggle. 
Easter Party Ideas for Kids

No party is complete without party hats!  These hats were made using the Pebbles Inc. Spring Fling collection. How cute is that little bunny?!
Easter Party Ideas for Kids


Using plastic short jars, I made favors for the moms that came to the party. I simply spray painted the lids of the jars as well as ceramic bunnies (found at Dollar Tree) and super glued them to the lids. Just fill them with Easter grass and jelly beans and you've got an easy and adorable Easter favor.
Easter Party Ideas for Kids


 The vintage collection hanging fans served as a beautiful backdrop for the party. The fans come in such lovely spring tones and added a soft pop of color to the party table. 
Easter Party Ideas

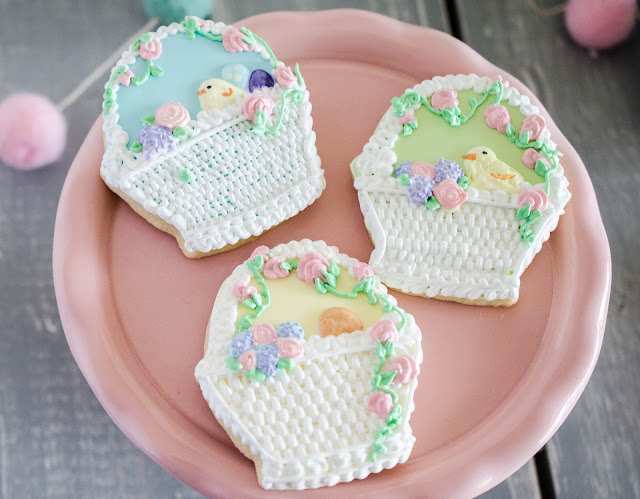
Let's all just take a moment to bask in the beauty that is Baby Gabey Cookies. My cousin Leigh is such an incredibly talented cookie artist! All the little details she adds to her cookies are simply amazing. 
Royal Icing Cookies


Royal Icing Cookies


The detail is just stunning. Can you see those itty bitty stars on the bunny's ear? Adorable.

Baby Gabey Cookies were the perfect fit for these vintage collection cupcake boxes. It's like they were made especially for them! Each guest was able to pick out their own cupcake box with a pretty cookie inside. I love the little windows on the cupcake box to give a tiny peek of what's inside.  


Each little guest picked out a dressed up bunnies magnet craft kit to put together. The kids had so much fun mixing and matching outfits for their little bunnies. 


The diy wonderful wood eggs were a huge hit with moms and kids alike. We watercolored them, decorated them with stickers, dyed them -  the possibilities were endless with these little eggs. After the eggs had dried, the kids hid them and had their own little Easter egg hunt. 

Everyone had a wonderful time crafting, playing, nibbling and giggling. 
Thank you so much to Oriental Trading Company for partnering with me. I had a blast!

Thanks for stopping by! 


Party supplies used from Oriental Trading Company:

Spring banner, wooden chocolate bunny and wood carrots from The Wood Connection
Gorgeous cookies from @babygabeycookies follow her on Instagram
Follow along on Instagram for more party inspiration! @fawn_parties


This review is based strictly on my opinion. I was provided the sample free of charge by Oriental Trading Company to provide my honest review. No other type of compensation was received. All ideas and opinions are my own. 

Friday, February 19, 2016

DIY Robin Eggs


Hello!
Easter will be here before you know it and I have a fun  Easter project to share with you today. Robin eggs are a sure sign of spring and I thought what better way to bring the sunny outdoors in, than with beautiful  blue speckled eggs. 

I used the ever-so-versatile DIY Wonderful Wood Eggs from Oriental Trading Company. They're the perfect base for the project. I've read tutorials to make speckled eggs using plastic eggs but I love that these eggs are made of wood. The paint goes on smoother and you don't have to paint nearly as many coats to get the right amount of coverage. 

Directions:
Paint the wooden eggs in Seafoam blue and allow to completely dry. 
Dab a toothbrush in brown paint and using your thumb, flick the bristles all over the egg until you receive the speckled look.  Allow to dry.
And that's it! Pretty simple. :)

They'd make a beautiful addition to your Easter brunch table or put them in a vase with moss and pebbles.  The possibilities are endless with these pretty little eggs. 


Supplies used:
Paint- Delta Creamcoat in Seafoam 
Brown acrylic paint
Foam brush
Toothbrush

This review is based strictly on my opinion. I was provided the sample free of charge by Oriental Trading Company to provide my honest review. No other type of compensation was received. All ideas and opinions are my own.  

Thank you for stopping by!

Wednesday, February 3, 2016

Valentine Scavenger Hunt


We have so much fun with scavenger hunts in our house and our little girl absolutely LOVES them. I thought for this Valentine's Day I'd make a little scavenger hunt for her. In each bag there are directions for the next clue, a tiny gift and a little note that has one of the many reasons we love her written on it. 

Whisker Graphics Middy Bags make it so easy to decorate and embellish your bags with Valentine goodness. For this project I used the Middy Bitty Bag size and attached cute little sayings from the Simple Stories You and Me Collection.


The bags were so simple to put together.  Just add some of your favorite pattern paper, a bit of Divine Twine, a couple buttons and that's it!


For the "I love you a latte" bag, I embellished with a doily and a bit of  white mica. To attach mica to the bag, spray adhesive spray to the entire bag then sprinkle the mica on top. Allow to dry for a few minutes. I just love the look of mica on a glassine bag. So pretty!


 I'm so excited for Cupid to hide these little bags throughout the house for Valentine's morning!
Thank you for stopping by!

 Supplies used:
Aqua Divine Twine
Glassine and Kraft Bags
White on Kraft Polka Dot Middy Bag
Paper- Simple Stories - You & Me
shredded basket filler
doilies
buttons


Tuesday, January 26, 2016

Nutcracker Tea Party

I probably should have posted this back in December but things got crazy and now here we are, a little more than a month later. So...here's some inspiration for next Christmas! ;-)

Since we were going to see the Nutcracker with some friends and their little girls, I thought it would be fun to have a little Sugar Plum tea party before the big show. Just something sweet and simple before the ballet to get the girls excited. Not that they really needed to be any more excited than they already were but if you know me, I just really need any kind of excuse to throw a party. 


For the place settings, I used tea and plate sets from Ikea, white doilies and silver snowflakes. Each little ballerina got a handmade snowflake wand with pink and blue ribbon attached. They loved dancing about with their wands pretending to be in the Land of Sweets. 


I loved making this sign of  Clara dancing with the Nutcracker. It was the perfect decoration for the party and it inspired the girls to dance and twirl around with the nutcracker doll we had sitting out. The slat sign can be found at The Wood Connection


I found these adorable Nutcracker books at Dollar Tree. I wrapped them in a cellophane bag, attached a candy cane cut out to the bag and set them on the chairs for the girls before they came in. They loved their little take home favors, :)

The girls had an enchanting time and the tea party was a perfect prelude to the magical Nutcracker ballet.

Thanks so much for stopping by!

Monday, January 18, 2016

Valentine Slat Sign with The Wood Connection

Hi there!
 I'm so excited to be guest posing for The Wood Connection and today I have a fun Valentine tutorial to share with you. I have always loved decorating for Valentine's Day and Wood Connection makes it so easy to change up your holiday decor from season to season. 
Today I'd like to share a slat sign and candy jar I made using supplies from the Wood Connection. I'm all about projects that are fairly quick and simple so I think you'll have fun making these. 


Supplies:
Horizontal Slat Sign
Candlestick Jar Accessory Kit
Candlestick
Love Vinyl
Mini wood heart, glass jar available at The Wood Connection
Creamcoat acrylic paint in Tomato Spice, Peony and Ivory
Foam brushes
Gold Glitter
Felt
Pink Paper
Doilies
Paper Flowers

Directions for the slat sign:
Paint entire sign ivory and allow to dry completely. Stick "love" vinyl to slat sign. Mix tomato spice and peony paint together to make a dark pink color. Paint the bottom two slats this dark pink color. Next, add a little more peony paint to the mixture so you have a bit lighter pink and paint the next slat the lighter pink color. Keep adding a little more peony to the paint mixture until it becomes lighter and add it to the next slat. For the top and final slat, paint with ivory and allow the entire sign to dry. Once the sign is dry, slowly peel off the "love" vinyl.


 For the felt and paper feathers, I cut two small pink and two large gray feathers out free-hand and glued them onto the sign. Next I added three small doilies and attached five paper flowers on top of the doilies.


Directions for the candy jar:
Paint the bottom of the candlestick and base a mixture of peony and tomato spice. It will be the same pink color as the bottom of the slat sign.


Keep adding a little peony to lighten the mixture and continue painting up towards the top of the candlestick. Paint the top of the lid peony and allow the lid and candlestick to dry.


Meanwhile, place tape around middle of the jar and apply wood glue to the bottom half of the jar. Sprinkle gold glitter until the glue is completely covered. Once the glue is dry, remove the tape so your jar will have an even finish. Apply wood glue around the top of the lid and sprinkle glitter on the lid as well. 


Apply wood glue to mini wood heart and sprinkle gold glitter on top of the heart. Attach heart to the top of the lid using wood glue.

 There you have it! Pretty quick and simple, right? The only thing left you have to do is decide which yummy Valentine candy you're going to put in your candy jar. :)

Thanks for stopping by and have a great day!