Fawn: Halloween Party Decor with Cricut Maker 3

Pages

Thursday, September 30, 2021

Halloween Party Decor with Cricut Maker 3


This is a sponsored post written by me on behalf of Cricut for Cricut. All opinions are 100% mine. This post contains affiliate links.


If you're planning a spooky soiree this Halloween, put your new Cricut Maker 3 to work and create beautiful projects for your Halloween party. Check out all the features of the new Cricut Maker 3 below. 


Features of the Cricut Maker 3

  • Cuts 300+ materials, from the most delicate fabric and paper to matboard and leather
  • Compatible with 13 tools for cutting, writing, scoring, foiling & embellishing
  • Up to 2X faster than its predecessor
  • 10X the cutting force4
  • Compatible with Smart Materials for cuts up to 12 ft (3.6 m) in one go
  • Works with Rotary Blade for cutting virtually any fabric
  • Works with Knife Blade for thicker materials up to 2.4 mm
  • Works with Scoring Wheels to create razor-sharp creases and crisp folds
  • Works with Foil Transfer Tool adds pro-level foil embellishments
  • Additional tools available for creating decorative effects like engraving, debossing & more
  • Bluetooth® wireless technology
  • Docking slot, USB port for charging devices & built-in storage
  • Compatible with Cricut Roll Holder to support rolls of Smart Material up to 75 ft (22.8 m)
  • Free design app for Windows® and Mac®

Now that you've been introduced to the new Cricut Maker 3, let's get started on some spook-tacular Halloween projects! These creepy creations are perfect for a haunted book club, a witches tea party or spooky gifts for all your Halloween loving friends. 


Skull Party Hat

Supplies:

Cricut Maker 3

Cricut Access

Smart Paper™ Sticker Cardstock, Black

Smart Paper™ Sticker Cardstock, White

Smart Paper™ Sticker Cardstock, Pastels

Skull Party Hat Image  


To create the skull party hat, open up the Skull Party Hat Image in Cricut Access. Since we're using the new Cricut Maker 3 Smart Materials, we're going to select "without a mat" and slide the Smart Paper™ Sticker Cardstock, right into the machine. Pretty cool to go matless! 


Select Smart Paper Sticker Cardstock as the material you're cutting and follow the prompts to complete the cut. 


Once all of your pieces have been cut, assemble the hat and arrange all the smaller pieces onto the hat how you'd like them. I attached the skull first and then framed the flowers, vines, and butterfly around the skull piece. What's great about the Smart Sticker Paper Cardstock is that the back is adhesive so you won't need any glue. Just peel and stick all of your pieces onto the hat and it's ready to go! 


Coffin Favor Box
Supplies used:


Cricut Access

Smart Paper™ Sticker Cardstock, Black

Smart Paper™ Sticker Cardstock, White

Smart Paper™ Sticker Cardstock, Pastels

Coffin Image


This coffin favor box is just waiting to be filled all of that delicious Halloween candy. These make fun and unique gifts for party guests that can also double as Halloween decor throughout the spooky season.

To create the coffin favor box, open up the coffin image in Cricut Access. We'll be using the Smart Paper™ Sticker Cardstock again for this project. I love not needing to use a mat or glue with the new Smart Paper™ Sticker Cardstock material. It makes the project that much easier!


Select Smart Paper Sticker Cardstock as the material you're cutting and follow the prompts to complete the cut. 


Once your pieces have been cut, fold and assemble the coffin box. Arrange the skeleton, flowers, vines, and butterfly on top of the coffin. Peel off the backing of the sticker paper and place the pieces onto the coffin box how you'd like. Party guests will love finding sweet surprises inside this creepy cute gift idea! 


Skull Favor Bag
Supplies used:

Cricut Maker 3

Cricut Access

Everyday Iron-On Black

Cricut EasyPress™ 2

Skull Gift Bag Image

Black and white check fabric

Pink ribbon

Sewing machine


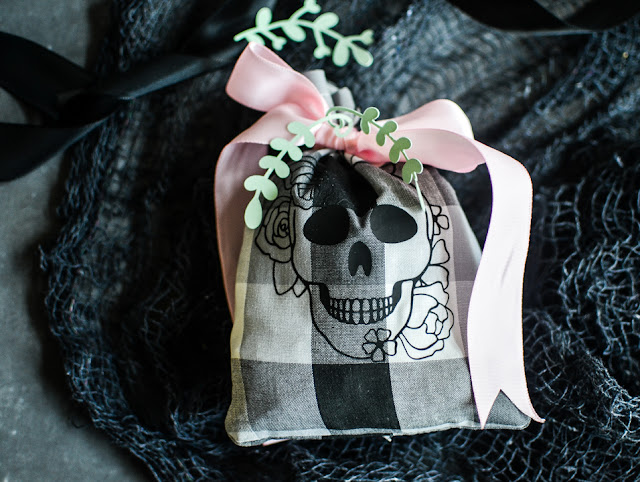
This skull and butterfly goodie bag is the perfect take home favor for party guests. It's also the perfect gift to fill with goodies and "boo" your neighbors with! Either way you decided to gift these spook-tacular bags, you know they'll be a huge hit! 


Open the skull gift bag image in Cricut Access and cut out two 6x8" pieces of black and white check fabric. I love that my Cricut Maker 3 cuts the fabric quickly and perfectly so I can whip out several at a time. 


Cut the skull out in black iron-on and be sure to "mirror" the image. 

Follow the prompts to cut all of your cotton and iron-on vinyl pieces out. 

Fold down about a half inch of fabric from the top of the bag and use a Cricut EasyPress Mini to make the seam lay flat. Next, sew the seam together but keep the two ends of the seam open so you can thread your ribbon through. Place the two pieces of fabric right sides together and sew around the perimeter of the bag careful to not sew up the top seams. 


Flip the bag inside out and cut off any loose threads. Attach a safety pin to a strand of ribbon and thread it through the open seams at the top of the bag.


Next, place the iron on skull image onto your finished bag and set the EasyPress to 340 degrees for 30 seconds. 


Carefully peel away the backing paper from the image. 


I had a few leftover paper vines from the coffin boxes so I attached them to the goodie bags, feel free to do the same! 
Fill the goodie bag with lots tricks and treats and they're ready to go. 


I hope you enjoyed making these creepy cute Halloween crafts with the new Cricut Maker 3 with me today!

Thanks so much for stopping by!


No comments:

Post a Comment