Fawn: 2015

Pages

Saturday, December 5, 2015

Santa Goodie Bag

Our family has a fun tradition of having North Pole Breakfast on December 1st. This is when the mischievous little elf on the shelf shows up and comes bearing a small gift. This year I put the gift in a glassine bag from Whisker Graphics and embellished it with doilies, white mica and a chipboard candy cane.  I also used the an Avery Design and Print Label which was fun and quick. I love that you can customize the labels  any way you want. 

The little goodie bag was a big hit with our daughter!  Although she questioned how the elf ( which she named "House Guest") could have carried the bag all the way from the North Pole not having fingers to hold the bag.
 Um...er....it's magic, we say. ;-)

Supplies used:
Glassine Bag- Whisker Graphics
Peppermint Divine Twine- Whisker Graphics
Design and Print Label- Avery
white mica
doilie
candy cane embellishment

Thanks for stopping by!

Sunday, October 25, 2015

Wee Witches Tea Party

What better way to usher in my favorite season than with a Wee Witches Tea Party in an enchanted forest. My daughter invited her two besties to join her in celebration of our favorite holiday, Halloween.  I'm thrilled to have the tea party featured on Kara's Party Ideas


Most everything for the tea party was from a thrift store, dollar store or was handmade. The tablecloth is actually a dress from the thrift store (thanks to my brilliant friend Janae for the idea!) that I cut up and tea stained. It fit perfectly over the little table.


I found some darling witch silhouette fabric at Joann's and knew I had to make a banner out if it.


The witch's broom name cards were made by cutting the ends of a  Whisker Graphic bag into strips, wrapping the bag around a paper straw and securing it with Gold Metallic Divine Twine. I then printed the names of each girl, cut it out banner style and attached it to the broom using a glue dot.
The little brooms were a huge hit with the girls. They kept trying to cast spells on each other throughout the party. 


The wee witches nibbled on autumn themed cookies and sipped apple cider. 

Cute cookies from our local grocery store

The crow wanted to party too. She came properly dressed in a fetching party hat and joined the wee witches at the table. 

I had a second table to hold treats and favors as well as to add a little extra witchy ambiance to the party. 


I bought the oval frame from the thrift store (50 cents!) painted and distressed it a bit. I then printed out a silhouette of a witch and glued it into the middle of the frame. Isn't she lovely? The spell book may look like it's over one hundred years old but the truth is, it's just a thrift store book that I soaked in tea water for a few hours and then let dry outside. The pages browned and curled up beautifully.
  

Each little guest received a witch themed tussie mussie filled with Halloween goodies to take home. They were filled with Halloween pencils, stickers, stamps, spider rings and glow sticks. 


 Getting ready to take flight!


The wee witches had such a delightful time. My little one (in white) loved having her favorite wee witches to dine with on that enchanting October evening. 

Thank you for stopping by!

Friday, October 16, 2015

Trick or Treat!

Hello and welcome!
 I'm so excited to be sharing a fun Halloween project with you. I fell in love with these little trick or treaters at The Wood Connection and thought they would be the perfect decoration for our family's upcoming trick or treat party.  I also made a cake stand out of a few simple products from Wood Connection.  You can never have too many cake stands, in my opinion. I love to put decorations on them that reflect the season and in this case, a glittery pumpkin. 

Supplies used:
large square plaque
three medium square plaques - available at Wood Connection
foam paint brushes
fine gold glitter
light ivory, charcoal and quaker grey paint
wood glue

Directions:
Paint two of the square plaques grey and two ivory. Paint the large square, circle plaque and candlestick charcoal. I chose to distress my pieces by sanding around all the edges and brushing a little cream paint along the edges as well.

 For the cake stand, glue the candlestick to the circle plaque and allow to dry.


Attach the large square plaque to the top of the candlestick using wood glue. Tie a polka dot ribbon around the base.

Pretty quick and simple, right?

Directions for the trick or treaters:
Paint the edges of two trick or treaters grey and two ivory. Don't worry about making them perfect, the front will be covered in glitter. 

Brush wood glue across the front of each piece and sprinkle gold glitter on them. Shake off the excess glitter and attach each trick or treater to a square plaque using wood glue. 

And there you have it! Two fun and simple projects to add a some festive Halloween flair to your home. 


A big thank you to Wood Connection for the opportunity to guest post for them! 
Have a Happy Halloween!  

Monday, August 10, 2015

Mermaid Gift Bags

Welcome!

If you are throwing a mermaid themed party or you have friends that are mermaid lovers, I have a fun project for you.  These bags would be prefect filled with bath salts or other pampering bath items. 

Directions:
Using a plain white kraft bag as your base, spray a coat of spray adhesive across the bottom half of the bag. Add a little dark blue glitter, light blue glitter and green glitter across the bottom half and shake off the excess glitter. 
Punch a hole in the top corner of the bag and thread through solid teal Divine Twine and silver metallic Divine Twine. Attach vintage mermaid images to the twine and tie in a bow. 


Thanks for stopping by!

Supplies used:
blue and green glitter
vintage mermaid images
basket shred


Sunday, July 12, 2015

Pony Party


My sister's little girl turned 2 in March but her birthday fell on the same few days they were moving to Qatar so they weren't able to do much to celebrate. Since they were coming to stay for the summer, I thought it would be fun to have a big party to celebrate Solvi turning 2!  And what better way to celebrate than with ponies. What little girl doesn't love ponies? 

Pony Party

Tassel garland from Studio Mucci

These pony favors were so simple to make and the kids adored them. I spray painted lids from mini mason jars as well as plastic ponies then attached the ponies to the top of the jars using super glue. I loved how they turned out and the kids especially loved the taffy inside.

Pony Party

Each little buckaroo got to take home a pony coloring book...


...and of course crayons to go with the book. 

Metallic gold mini bags from Whisker Graphics

The little ranch hands ate sack lunches filled with cowboy grub out on the lawn. It was a good thing they fueled up because we had a lot of fun games planned!


The kids had a blast playing the pool noodle and balloon game and pin the tail on the donkey but the favorite game they played was panning for gold in the sandbox. The kids each panned for gold nuggets (spray painted rocks) using pie tins with holes punched through them.  Once they found 5 gold pieces, they headed over to the corral to trade them in at the trading post for their very own pony.


Pony Party

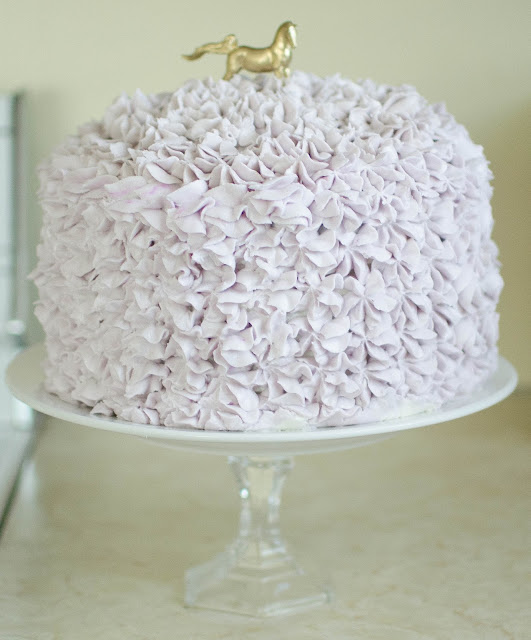
The cake I made had layers of pink, cream and purple with lavender frosting. And of course, it had to be topped with a golden pony.  :-)
Pony Party

We all had such a fun time and I was so happy we were able to celebrate with little Solvi!

Thanks for stopping by!

Saturday, July 11, 2015

Retro Kitchen Gift Bags with Whisker Graphics

Hello!
Today I wanted to share retro inspired gift bags using products from Whisker Graphics. One of my favorite items Whisker Graphics has are the glassine bags because they are so versatile. For this project, I tucked  kraft polka dot middy bags inside the glassine bags so the polka dots peeked through a bit. 


I placed a little bitty kraft bag on top of the glassine bag and attached a retro inspired label to it. I then embellished with buttons, doilies and divine twine.


These gift bags would be a fun presentation for the baker in your life. :)


Thanks for stopping by! 

Melissa Frances Groovy Diner Labels
basket shred
clothespin
buttons
doilies

Friday, June 26, 2015

Reading Nook Decor with The Wood Connection


  It's always such a blast to be a guest blogger for The Wood Connection and I'm so excited to share with you a project I made for my little girl's room. 

I wanted to create a cozy reading nook for my daughter to encourage her budding reading skills. There was some unused space under her bunk bed that was just begging to be turned into a reading area. We put in huge pillows, shelving, fairy lights and a canopy around it so she could have her very own little space to relax and read. 

The nook just needed a few final touches and that's where these fun bookends, banner and wall hang came in. They were the perfect addition to the reading nook. 


Directions for the bookends:
Spray paint candle cups and wood letters gold and allow to dry. Paint both blocks using sea foam acrylic paint and allow to dry as well. 

When all pieces are dry, attach the letters to the blocks using wood glue and attach the candle cups to the bottom of the blocks using wood glue as well. Let dry. 

And that's it for the bookends! Pretty simple, right?


Directions for the banner:
Paint all pieces of banner wood with coral acrylic paint and let dry. Cut out pattern paper to fit the banner pieces and adhere to each piece. String baker's twine though the holes in the banner.


I painted and lightly distressed the box sign to hang on the wall of the reading space. I had a sweet little card that my daughter received for her 1st birthday and I thought it would look darling inside the box sign.


So there you have it! Three extremely quick and easy projects to add a little sweetness to any space. 
Thanks for stopping by!


Supplies used:

Modern Alphabet wood letters
4x6 Photo Block
Candle Cup
Banner Shape Flag
Banner Shape Triangle
Box Sign
Wood Glue
Foam brush
Sea foam blue and coral acrylic paint - available at The Wood Connection
Gold spray paint